

This article and code example may not work with the most recent versions of the Raspberry Pi operating system. You may be required to make updates to the code for the sensor to work.
MaxBotix USB ultrasonic sensors make your Raspberry Pi Zero Projects even easier.
This tutorial teaches you how to connect a Raspberry Pi Zero, as well as the other members of R-Pi family, with an ultrasonic sensor to read data from the USB port. You may want to check out our tutorial on Raspberry Pi TTL Tutorial to connect your Raspberry Pi Zero over the serial port and You may want to check out our tutorial on Raspberry Pi.
The R-Pi family of products opens the world of coding up to all ages with their easy interface and budget-friendly pricing. The Raspberry Pi is a single-board computer small enough to fit in your wallet, and the Raspberry Pi Zero is even smaller. These computers can do most anything a standard PC can from writing up documents to sending emails or playing games. For more information to learn more about the Raspberry Pi Zero, visit the following links: Getting Started with Raspberry Pi Zero and Raspberry Pi Zero: What you need to know.
Raspberry Pi Zero: Review & Setup
Ultrasonic sensors can easily be connected to the Raspberry Pi via the serial port or by USB. An ultrasonic sensor will give you valuable range data in your application that can be used for object detection, navigation, level detection, and a host of other possibilities. As ultrasonic sensors use sound, they can be used in a number of applications where the temperature or visual characteristics of an object hinder or may hinder IR or laser-based ultrasonic sensors. This makes them ideal for raspberry pi zero applications. For more information on R-Pi and R-Pi projects, check out MaxBotix’s Pi Projects section where you’ll find exclusive information for the Raspberry Pi.
Raspberry Pi USB Ultrasonic Sensor Integration Key Takeaways
- USB ultrasonic sensors easily integrate with the R Pi needing only a terminal program.
- The setup of a USB Rangefinder requires no soldering, only a USB cable.
- The Raspberry Pi is a convenient and affordable way to read USB ultrasonic sensor range data, perfect for pi zero projects.
 MaxBotix sells a number of USB ultrasonic sensors which can directly connect to the Raspberry Pi. This tutorial will teach you how to interface a Raspberry Pi with an USB ultrasonic sensor.For the safety of the electronics, please use an ESD strap when working around components. Static discharge could damage components of the R-Pi as well as the USB Ultrasonic Sensor Raspberry.
USB Ultrasonic Sensor Raspberry Pi Equipment List
- Raspberry Pi with an Operating System.
- USB Ultrasonic Sensor.
- A micro USB to USB cable.
- ESD strap.
- USB OTG Host Cable - MicroB OTG male to A female (for Raspberry Pi Zero).
- Powered USB hub (optional).
Directly Compatible USB Ultrasonic Sensors
- Our complete line of our High Resolution USB Ultrasonic Sensors.
- Our complete line of our Proximity USB Ultrasonic Sensors.
- Our complete line of our Outdoor USB Ultrasonic Sensor.
- Our complete line of our High Resolution Ultrasonic Sensors.
Getting Started
 You will need to install an operating system if this is the first time using your Raspberry Pi. This article was tested on the R Pi 2 and 3 using the Raspbian Jessie operating system (downloaded on 10/6/2016). An additional cable is needed for the Raspberry Pi Zero to connect to the USB OTG port.
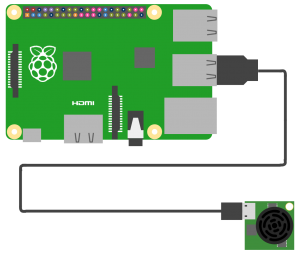
Step One: Connect the USB Ultrasonic Sensor
To connect a MaxBotix USB ultrasonic sensor to the Raspberry Pi, you will need to connect the micro USB end of the cable into the USB ultrasonic sensor and the standard USB end into the R-Pi. The Raspberry Pi Zero does not have a standard USB A port to connect an ultrasonic sensor. To connect your USB ultrasonic sensor to the R-Pi Zero, you will need a USB OTG Host Cable - MicroB OTG male to A female style cable. This is essential for a raspberry pi zero headless setup usb. If connecting multiple ultrasonic sensors via USB, it is recommended to use a powered USB hub to ease the current draw from the R-Pi.

Optional Step: Download a Python Script
This is optional, but you may wish to write or download a Python Script to log and store the data you collect with your ultrasonic sensor.
Here is a sample python script.
Installing Terminal Software to Read the Sensor
Regardless of whether you’re using the R-Pi Zero or the R-Pi 3, the recommended software for accessing the range data output is Minicom. Please use the following steps to install Minicom:
- Open LXTerminal
- Download Minicom with the following command:
sudo apt‑get install minicom
This will install the Minicom software that is used for reading the serial port.
Accessing USB Ultrasonic Sensor Range Data Output
Minicom is the recommended terminal software for Raspbian Jessie operating system. When only one ultrasonic sensor is connected it should be found on ttyUSB0. The USB serial port on the Raspberry Pi will enumerate in the following way: /dev/ttyUSB0, /dev/ttyUSB1, /dev/ttyUSB2, and so on. This will depend on how many devices you connect.
When connecting multiple ultrasonic sensors, they will enumerate in the order they were connected. They will maintain their address until the Raspberry Pi is shut down. Upon repowering, they will enumerate in a default order format. This new enumeration should not change even with restarting the Raspberry Pi unless you physically disconnect or reorder the ultrasonic sensors.
Please use the steps below to access Minicom and read the range data.
- Open LXTerminal Open Minicom with the following command (use the correct ttyUSB address for the ultrasonic sensor you wish to read):
minicom -b 57600 -o -D /dev/ttyUSB0
This clears the LXTerminal window and you will see a window that looks similar to the image below.

The number following the ASCII character is the range reading that is output by the ultrasonic sensor. If the readout says R0764, like the image above, the range to the target is 764mm. As the target gets further away from the ultrasonic sensor, the reported range will increase. If no target is detectable, the target will report maximum range.
Adding a Webcam
If you want to actually see what you are sensing, you can additionally install a USB webcam to your Raspberry Pi too. Before purchasing a webcam to use with your Raspberry Pi, verify that the webcam is supported by Ubuntu.
For applications where you only need to take still pictures, fswebcam is an excellent light application with a number of settings to help you get the most out of your camera. Do note that fswebcam does not have a graphic interface, so you have to run it through LXTerminal. You can install fswebcam by doing the following.
- Open LXTerminal
- Download fswebcam with the following command:
sudo apt-get install fswebcam
Applications where a true video stream is required or applications that prefer a true graphic interface may prefer to use cheese. Cheese is a popular application for taking both still pictures and video through a GUI interface. You can install cheese by doing the following.
- Open LXTerminal
- Download cheese with the following command:
sudo apt-get install cheese
Please visit the Raspberry Pi and/or Ubuntu forums for additional webcam support.
Final Notes & Outcome
Using an ultrasonic sensor with a Raspberry Pi allows for inexpensive height measurement, navigation, and countless other applications that require distance measurement. If you have any applications or code that can be added to this article, or if you would like to share pictures of your setup with us so we can share with others please email webmaster@maxbotix.com.
Products Related to the Article:

HRUSB-MaxSonar-EZProduct Line
HRUSB-MaxSonar-EZ ultrasonic rangefinders offer 1mm resolution, an easy to use Micro-B USB connection, temperature compensation, automatic calibration, high accuracy, and stable operation in multi-sensor environments. The output of this sensor line will be sent over USB.
MB1424USB-ProxSonar-EZ2
Features of the MB1424, USB-ProxSonar-EZ2, include one-inch resolution, both proximity and range information for the nearest detectable target, and serial data over an easy to use USB interface.
MB1434USB-ProxSonar-EZ3
Features of the MB1434, USB-ProxSonar-EZ3, include one-inch resolution, both proximity and range information for the nearest detectable target, and serial data over an easy to use USB interface.
Support Limitations MaxBotix provides code examples as a reference starting place for our customer. At the time of development, the code examples worked for the given platform and setup. Due to the fast changing nature of these platforms (Hardware, OS and peripheral devises), we are unable to keep up with the changes in these code examples. Additionally, every system setup is different which further increases the complexity of the system and troubleshooting. Support for code is very limited regarding our free sensor support system. We recommend using the platforms forums for support to help troubleshoot the code issue as these are the most up to date regarding information. We do offer paid engineering support for code if this is something you may be interested in. Please contact us if you would like to look into this.Please see the Raspberry Pi forum for more support at this link: https://www.raspberrypi.org/forums/