This article and code example may not work with the most recent versions of the Raspberry Pi operating system. You may be required to make updates to the code for the sensor to work.
Learn how to enable your Raspberry Pi for I2C.
Brief Synopsis: This tutorial demonstrates how to set up an I2C circuit using a Raspberry Pi product such as the classic Raspberry Pi, Raspberry Pi Zero, Raspberry Pi 2, or Raspberry Pi 3 and an I2C Sensor MaxSonar. The article was written and tested on an R Pi with the September 2016 version of the Raspbian Jessie with PIXEL OS. For more information regarding the Raspbian Jessie with PIXEL OS, check out this article from Raspberry Pi, here.
Raspberry Pi I2C Ultrasonic Sensor Integration Key Takeaways
- Raspberry Pi Zero allows for easy setup of an I2C circuit with I2C Ultrasonic sensors.
- The clock speed on a Raspberry Pi products must be set no higher than 50 kHz.
- A separate power supply is advised when using the R Pi Zero with multiple ultrasonic sensors.
Update all Packages
The software packages for the Raspberry Pi, like all other software, go through routine updates. If this is a new install of the OS or you do not regularly update the software, it may take longer to update all the packages.
- First, update the list of all software packages. Open the terminal and run: sudo apt-get -y update
- Use the following to update all of the software packages. Open the terminal and run:sudo apt-get -y upgrade
I2C Sensor Communication
 To enable I2C communication on your Raspberry Pi Zero or other Raspberry Pi device:
1) Select Raspberry Pi Configuration under the Preferences in the applications menu.2) Select the Interfaces tab.3) Select to enable I2C and click OK.
Adjust the Clock Speed
The default clock frequency of the Raspberry Pi Zero and other Raspberry Pi products needs to be adjusted for proper operation with a MaxBotix I2C sensor. MaxBotix I2C sensors operate at a maximum I2C clock speed of 50KHz unless clock stretching is used. While the Raspberry Pi hardware can theoretically support clock stretching, there is a known hardware and/or driver bug on the Raspberry Pi that prevents this from working reliably. This issue is known to affect the Raspberry Pi 4 and all previous models. You can learn more about this issue here: https://github.com/raspberrypi/linux/issues/4884
In practice, this issue results in the Raspberry Pi receiving intermittently corrupt data from the sensor. For example, we have observed the Raspberry Pi receiving range values of >32000cm, which are clearly erroneous and are the result of a bit being improperly read over the I2C bus when the MaxBotix sensor attempts to stretch the clock. As such, with Raspberry Pi, the maximum clock speed of 50 kHz is recommended for proper operation of Maxbotix I2C Ultrasonic Sensors. The steps below show how to adjust the baud rate. If you want to use a speed other than 50 kHz, just swap out 50,000 for the appropriate value.
1) Open the terminal and run: sudo nano /boot/config.txt
2) At the end of the file insert:dtparam=i2c1_baudrate=50000
3) Close the file by pressing Ctrl and X
4) Save the file by pressing Shift and Y
5) Reboot the Raspberry Pi.
Enable I2C and Install Tools on Raspberry Pi Using a Python Script
A Python script can take advantage of the System Management Bus, SMBus, to control I2C devices on the R Pi Zero and other R Pi products. The example script is set up to continually range from the connected sensors. For more information on how to use a Python Script, check out How to Write and Run a Python Program on the Raspberry Pi.
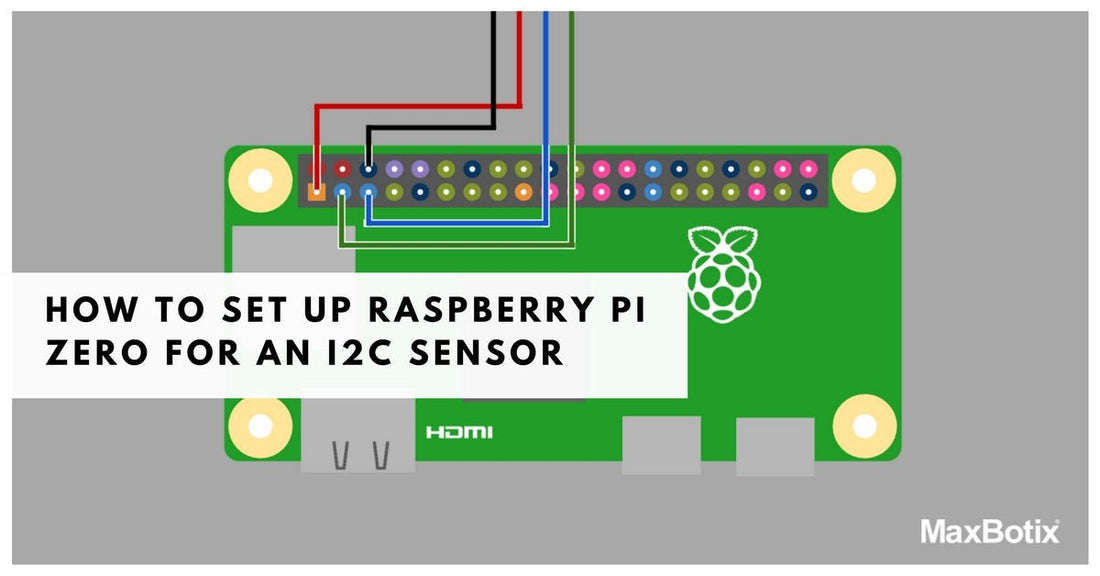
Wiring Diagram for Raspberry Pi
The following wiring diagram displays the R Pi Zero, but should be compatible with any of the other Raspberry Pi devices.

THIS IMAGE IS NOT DRAWN TO SCALE.THE IMAGE IS SOLELY INTENDED AS A WIRING REFERENCE.
Understanding the Python Script
The Python script includes three primary functions to initiate a range reading, report a range reading, and change a sensor address. The included functions and their related information are as follows:
A. take_range (address)
Description: Uses the SMBus package on the R Pi to start a sensor at the given address. You should start the sensor 100ms before requesting a range from it if you want the most recent information.Parameters: address: a hexadecimal value corresponding to the seven-bit address of the ultrasonic sensor you want to command a range reading at. The default value for I2C‑MaxSonar ultrasonic sensors is 112 in the seven-bit format.Note: An error message will be generated if the communication was not successfully completed. No message is sent if communication is successful.Note: Care should be taken to only operate one ultrasonic sensor at a time. Commanding more than one ultrasonic sensor to range at once may cause cross-talk (interference).
B. report_range (address)
Description: Uses the SMBus package on the Raspberry Pi to read the latest range from an ultrasonic sensor at the given address.Parameters: address: a hexadecimal value corresponding to the seven-bit address of the ultrasonic sensor you want to command a range reading at. The default value for I2C‑MaxSonar ultrasonic sensors is 112 in the seven-bit format.Note: When communication is successful the range data will be sent (for the current I2C‑MaxSonar ultrasonic sensors this is a value between 20cm and 765cm). An error message will be sent if there was an error in communication.Note: The I2C‑MaxSonar ultrasonic sensors are configured to report the last range reading stored in memory. Because of this, read_sensor() is called after at least 100ms has elapsed after running the function start_sensor(). Readings can be taken faster if absolutely required, but this will limit the maximum range of the ultrasonic sensor. (See the datasheet here for more details.)
C. change_address (old_adress, new_address)
Description: Uses the SMBus package on the Raspberry Pi to change the ultrasonic sensor address at old_address to new_address.Parameters: old_address: a hexadecimal value corresponding to the current seven-bit address of the sensor. The default value for I2C‑MaxSonar ultrasonic sensors is 112 in the seven-bit format.Parameters: new_address: a hexadecimal value corresponding to the desired seven-bit address of the sensor. The following addresses are invalid and will not be allowed: 0, 40, 82, and 85.Note: An error message will be generated if the communication was not successfully completed. No message is sent if communication is successful.Note: For other devices operating on the I2C bus: It is recommended that you use addresses for the I2C‑MaxSonar that are below 120. This keeps the sensor away from the reserved address space.

Code Example
Here's a link to download the Python script for the Raspberry Pi.
Concluding Remarks
We hope this I2C tutorial is a good introduction and helps to simplify a complex interface. If you have any questions regarding using an I2C Sensor MaxSonar with a Raspberry Pi, please email our technical support team by completing this Tech Support Form.
Recommended easy-to-use I2C Sensors for the Raspberry Pi Zero:

MB1212I2CXL-MaxSonar-EZ1
Features of the MB1212, I2CXL-MaxSonar-EZ1, include centimeter resolution, a great blend of sensitivity as well as side object rejection, short to long distance detection, range information from 25cm to 765cm, up to a 40Hz read rate, and an I2C interface.

MB7040I2CXL-MaxSonar-WR
The industrial outdoor I2CXL-MaxSonar-WR sensors have a robust PVC housing designed to meet IP67 water intrusion. The sensors provide short to long distance detection and ranging with a narrow beam pattern. The I2CXL‑MaxSonar‑WR outdoor ultrasonic sensors have high power output, noise rejection, auto calibration, and factory calibrated beam patterns.
MB7138XL-TrashSonar-WRM
Features of the weather resistant MB7138, XL-TrashSonar-WRM, include centimeter resolution, short to mid distance detection, range information from 20cm to 350cm to the target with the largest acoustic return, a 6.7Hz read rate, and various output options: pulse-width, analog voltage, and RS232 serial.
See how the TrashSonar would work in Smart Waste Management Applications.
Support Limitations MaxBotix provides code examples as a reference starting place for our customer. At the time of development, the code examples worked for the given platform and setup. Due to the fast changing nature of these platforms (Hardware, OS and peripheral devises), we are unable to keep up with the changes in these code examples. Additionally, every system setup is different which further increases the complexity of the system and troubleshooting. Support for code is very limited regarding our free sensor support system. We recommend using the platforms forums for support to help troubleshoot the code issue as these are the most up to date regarding information. We do offer paid engineering support for code if this is something you may be interested in. Please contact us if you would like to look into this.Please see the Raspberry Pi forum for more support at this link: https://www.raspberrypi.org/forums/